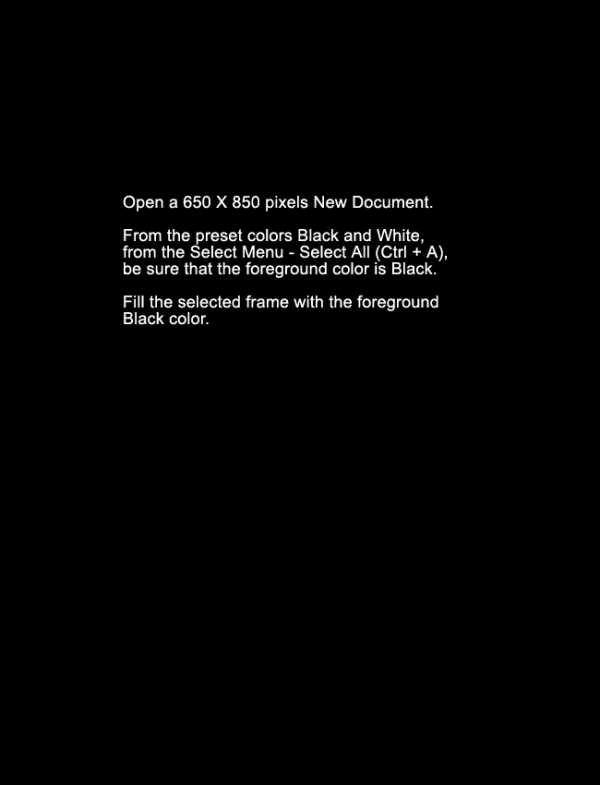
Step 1
Open a 650 X 850 pixels New Document
From the preset colors Black and White (D), be sure that
black is the foreground color.
Edit - Fill
Fill with Foreground color.
This will fill the frame with Black color.
From the preset colors Black and White (D), be sure that
black is the foreground color.
Edit - Fill
Fill with Foreground color.
This will fill the frame with Black color.
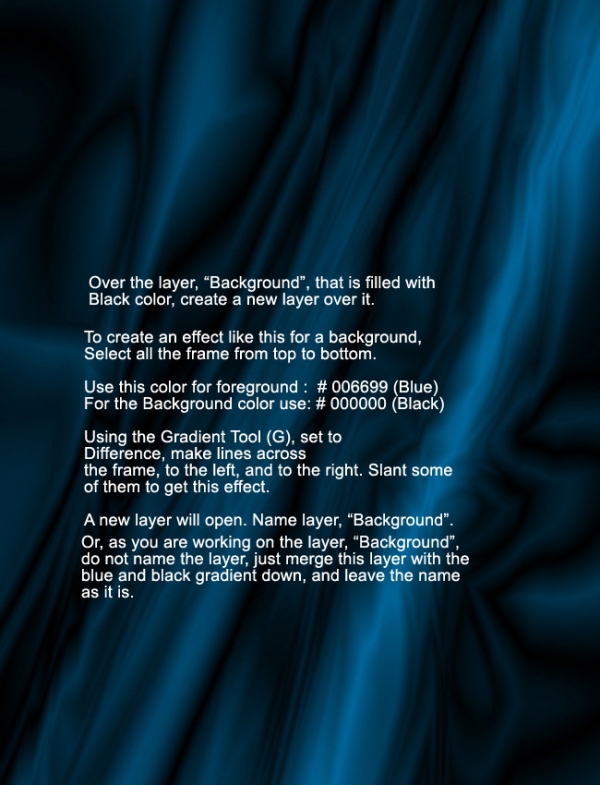
Step 2
Over the layer, "Background, that is filled with Black color, create a New Layer
over it.
To create an effect like this. (I personally like these kinds of effects for backgrounds, but, you can use a background of your own). Select all the frame from top to bottom.
Use this color for foreground: # 006699 (Blue).
Use this color for background: # 000000 (Black).
Use the Gradient Tool (G), set to Difference. Make lines accross the frame,
to the left and then to the right. Slant some of them to get this effect.
A New Layer will open. Name this layer, "Background".
As you are working on the layer, "Background", do not name the layer. Merge the layer down and leave the name as it is.
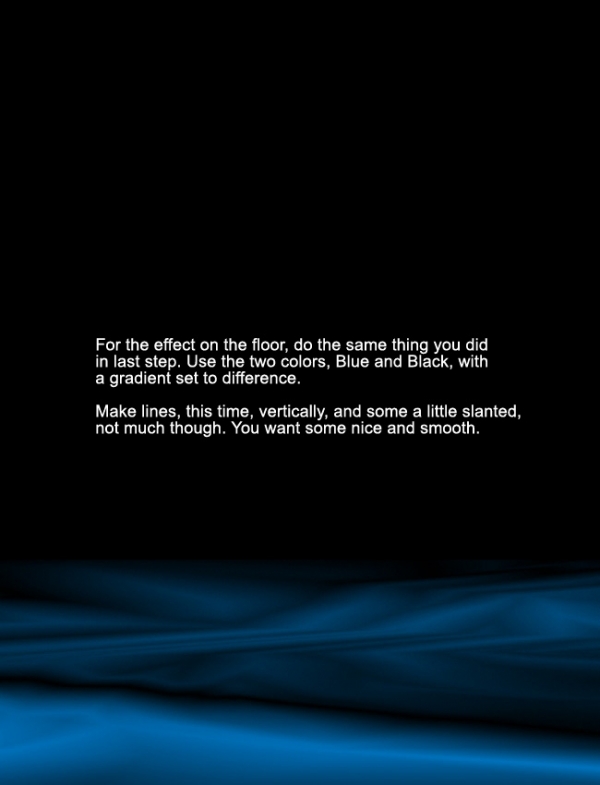
Step 3
For the effect on the floor, do the same you did in last step. Use the two colors, Blue and Black.
Set the Gradient to Difference.
Make more lines, this time, vertically,and some a little slanted, do not overdo it. You want the result nice and smooth.
Set the Gradient to Difference.
Make more lines, this time, vertically,and some a little slanted, do not overdo it. You want the result nice and smooth.
Step 4
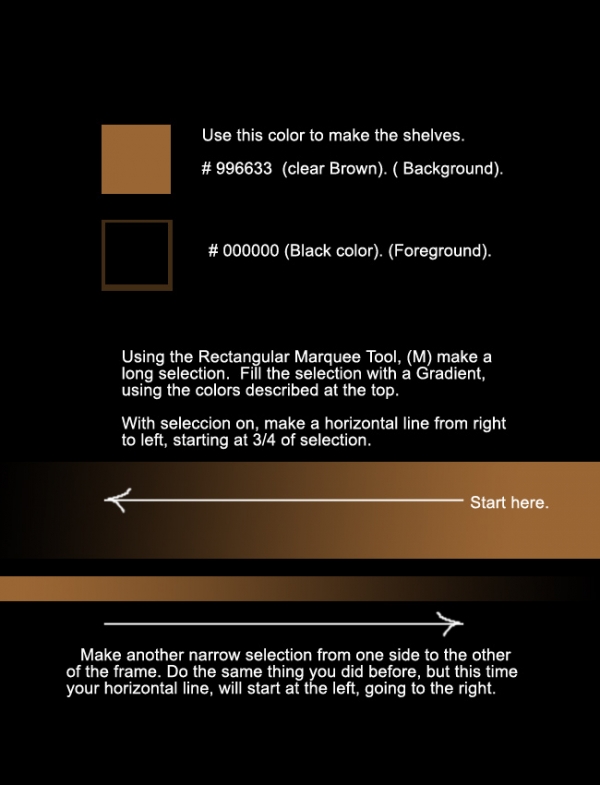
Making the Shelves.
Use a # 996633 (Clear Brown color) as your background.
Use a # 000000 (Black color) as your foreground.
Use a # 996633 (Clear Brown color) as your background.
Use the Rectangular Marquee Tool (M), make a long selection from one side to the other of your frame. Fill the selection with a Gradient, using the colors described at the top of the image for this step.
With selection "on", make a horizontal line from right to left, starting at 3/4 of selection.
Make another narrow selection, from one side to the other of the frame as you did before. Do the same, but this time your horizontal line, will start at the left going to the right.
Do not name the layer yet, there is more to do in next step.
Use a # 996633 (Clear Brown color) as your background.
Use a # 000000 (Black color) as your foreground.
Use a # 996633 (Clear Brown color) as your background.
Use the Rectangular Marquee Tool (M), make a long selection from one side to the other of your frame. Fill the selection with a Gradient, using the colors described at the top of the image for this step.
With selection "on", make a horizontal line from right to left, starting at 3/4 of selection.
Make another narrow selection, from one side to the other of the frame as you did before. Do the same, but this time your horizontal line, will start at the left going to the right.
Do not name the layer yet, there is more to do in next step.
Step 5
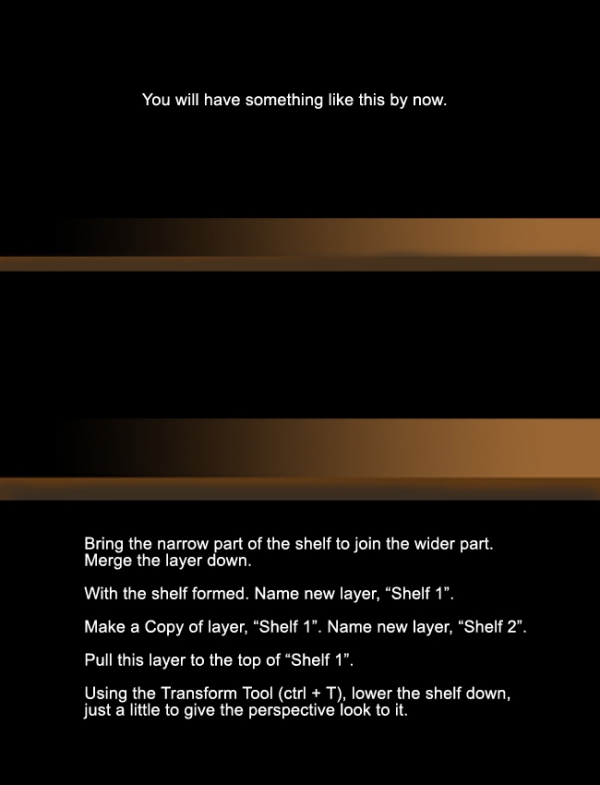
You will have something like this at the end of this step.
Bring the narrow part of the shelf to join the wider part.
Merge the layer down.
With the shelf formed, name new layer, "Shelf 1".
Make a copy of layer, "Shelf 1". Name new layer, "Shelf 2".
Put this layer on top of "Shelf 1".
Use the Transform Tool (Ctrl T) to lower the layer, "Shelf 2". just a little down to give the perspective look to it.
Step 6
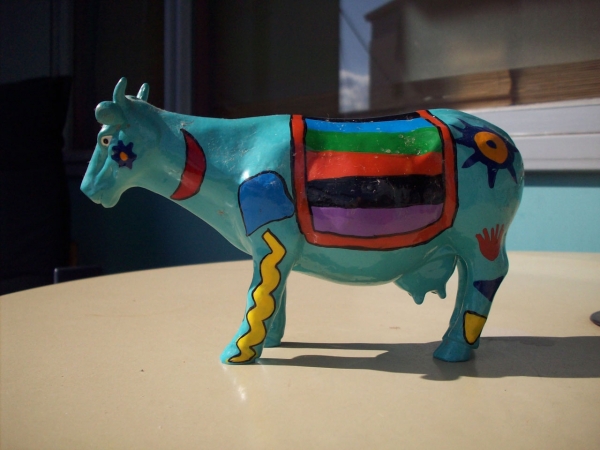
Here is the image of the "Blue Cow" we are going to be working with. The photo was provided by robvdn. (Thank you!)
You can download the image.
Click on the image of the cow, using the right side of your mouse.
When window opens. Save Image As.
Save the image in a place where you can have easy access to it. We'll use this image several times later.
You can download the image.
Click on the image of the cow, using the right side of your mouse.
When window opens. Save Image As.
Save the image in a place where you can have easy access to it. We'll use this image several times later.
Step 7
Let's make a plate!
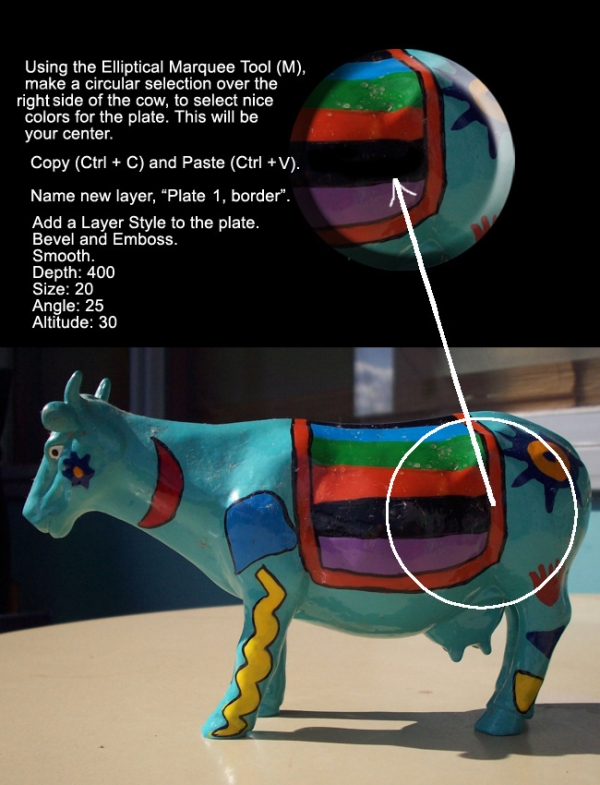
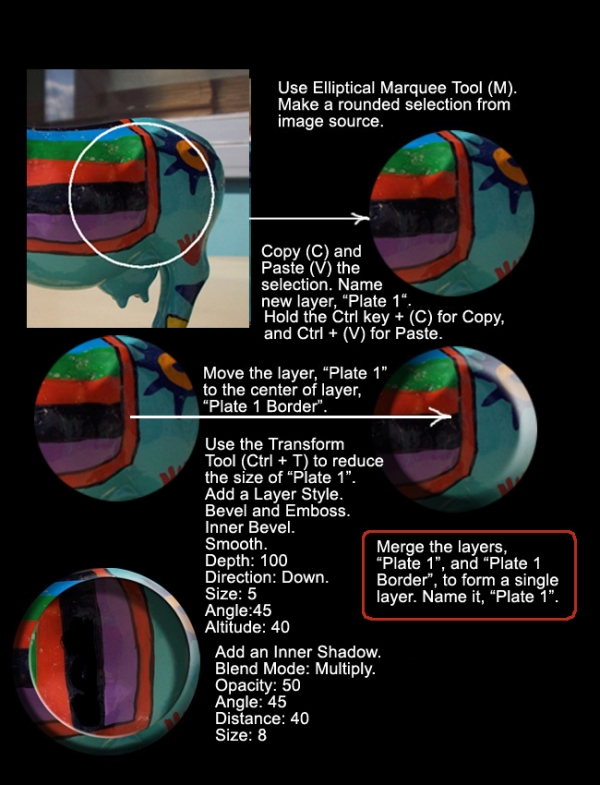
Using the Elliptical Marquee Tool (M), make a circular selection over the right side of the cow.
Select nice colors for the plate. This will be placed in the center.
Copy (Ctrl + C) and Paste (Ctrl + V) selection.
Name new layer, "Plate 1 Border".
Using the Elliptical Marquee Tool (M), make a circular selection over the right side of the cow.
Select nice colors for the plate. This will be placed in the center.
Copy (Ctrl + C) and Paste (Ctrl + V) selection.
Name new layer, "Plate 1 Border".
Step 8
For this step, I would like you to read carefully all the given steps to form the plate. I think if I write the steps here again. I can confuse you.
This is very important. If you are able to do it, you won't have problems doing the rest. Please, take the time to read it. If you make mistakes, go back.
This is very important. If you are able to do it, you won't have problems doing the rest. Please, take the time to read it. If you make mistakes, go back.
Step 9
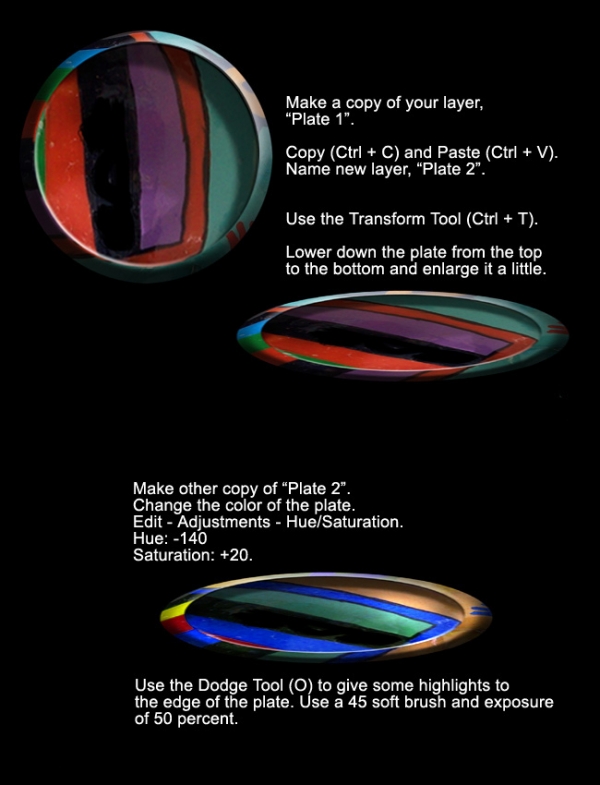
Make a selection of your layer, "Plate 1".
Copy (Ctrl + C) and Paste (Ctrl + V) selection.
Name new layer, "Plate 2".
Use the Transform Tool (Ctrl + T), to lower the plate down, from the top to the bottom.
Make another copy of your layer, "Plate 2". Name new layer, "Plate 3".
Use the adjustments shown below to change the color of the plate.
Copy (Ctrl + C) and Paste (Ctrl + V) selection.
Name new layer, "Plate 2".
Use the Transform Tool (Ctrl + T), to lower the plate down, from the top to the bottom.
Make another copy of your layer, "Plate 2". Name new layer, "Plate 3".
Use the adjustments shown below to change the color of the plate.
Step 10
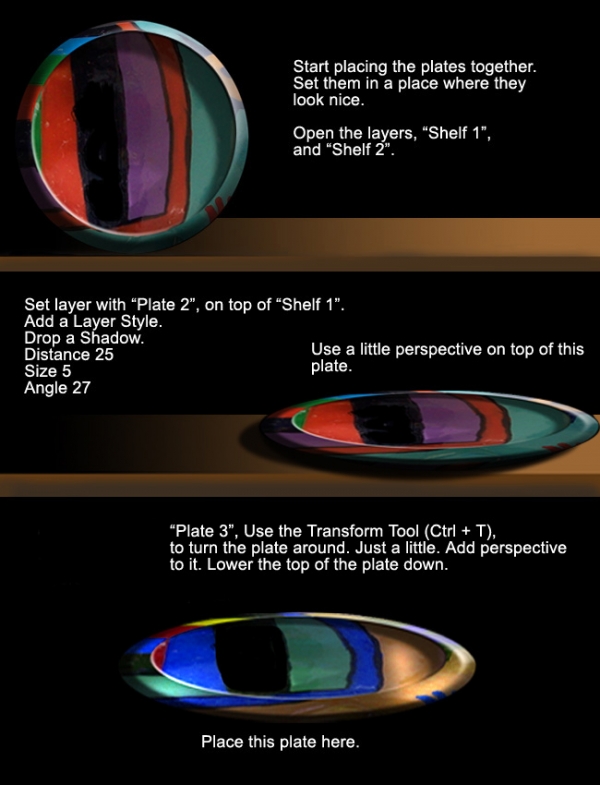
In this step we'll be placing some of the objects we have done so far over the shelves.
Open the layers, "Shelf 1", and "Shelf 2".
Add the Layer Styles as it is indicated in the image.
It is important to know that colors is up to you. I used the colors I thought will look nice, as the image of the cow is so colorful. Blue is a nice color, if you want to stay with these colors are ok, but if you would like to try other kinds of colors for your plates, just practice with the Hue and Saturation.
Step 11
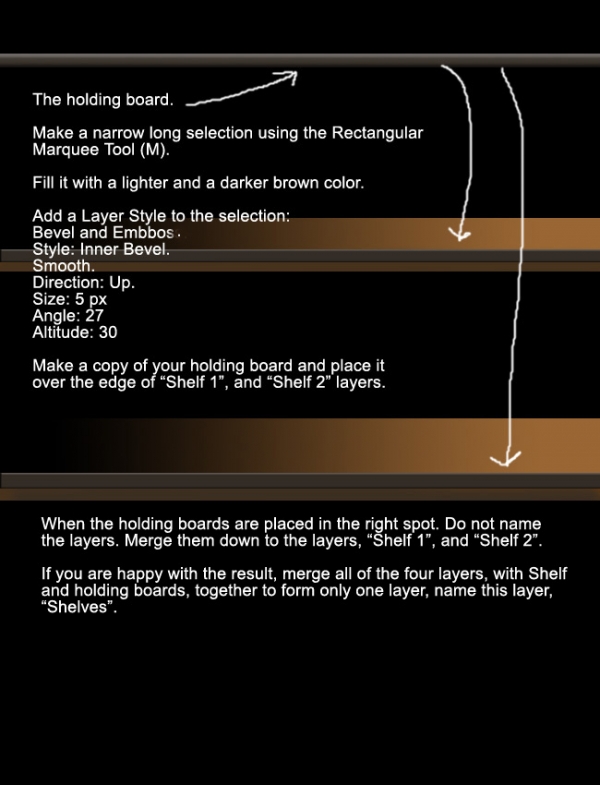
The holding board.
To make this holding board, make a narrow selection using the Rectangular Marquee Tool (M).
Fill the selection with a lighter and a darker Brown color.
Do not name the layers.
Add a Layer Style to the selection:
Bevel and Emboss.
Style: Inner Bevel.
Smooth.
Direction: Up.
Size: 5 px
Angle: 27
Altitude: 30
Make a copy of your holding board and place it over the edge of "Shelf 1", and "Shelf 2" layers.
Merge down the two layers with the holding boards to the layers Shelf 1 and Shelf 2.
If you are happy with the result, you can merge all four layers to form one. Name this layer, "Shelves".
Step 12
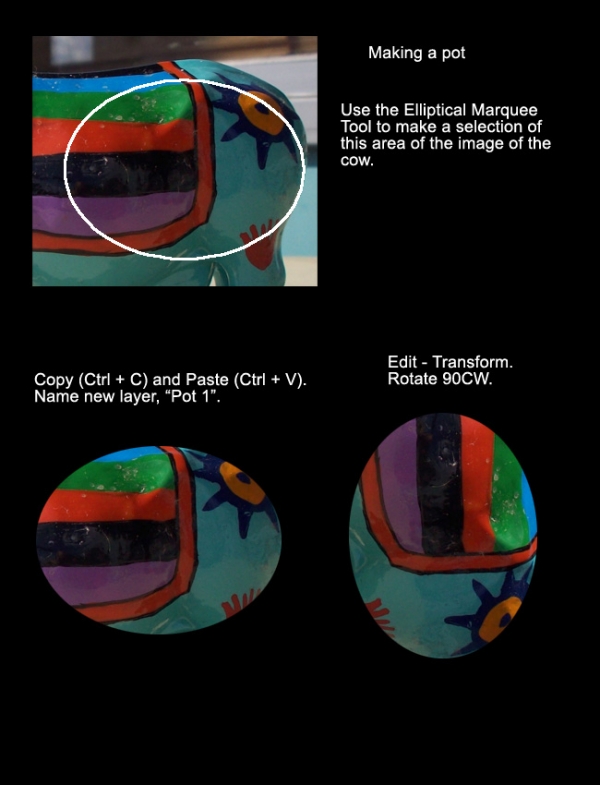
Making a pot
Use the Elliptical Marquee Tool (M), to make a selection of the area shown of the image with the blue cow.
Copy (Ctrl + C) and Paste (Ctrl + V).
Name the new layer, "Pot 1".
Edit - Transform.
Rotate 90CW.
Use the Elliptical Marquee Tool (M), to make a selection of the area shown of the image with the blue cow.
Copy (Ctrl + C) and Paste (Ctrl + V).
Name the new layer, "Pot 1".
Edit - Transform.
Rotate 90CW.
Step 13
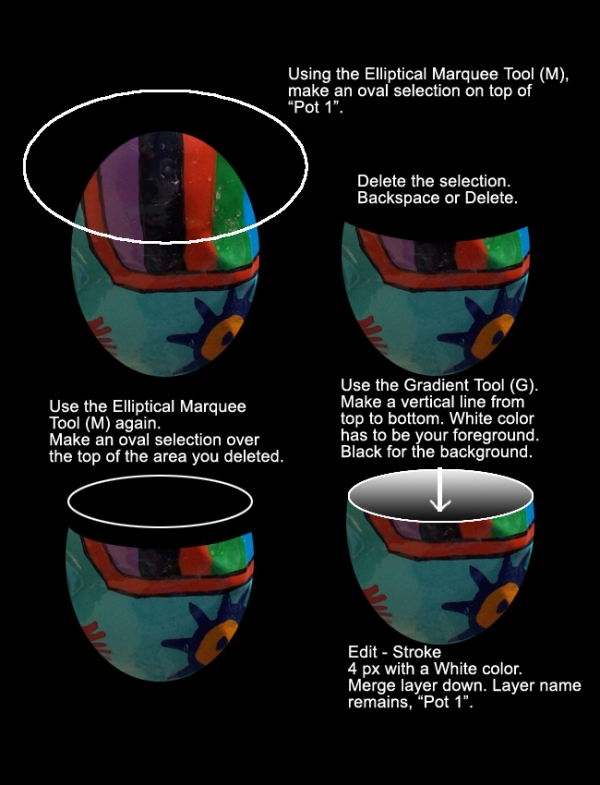
Using the Elliptical Marquee Tool (M), make an oval selection on top of layer, "Pot 1".
Delete the selection. Backspace or Delete.
Use the Elliptical Marquee Tool (M) again.
Make an oval selection over the top of the area you deleted.
Use the Gradient Tool (G).
Make a vertical line from top to bottom.
White color has to be your foreground color.
Black color for the background.
Edit - Stroke.
Use a 4 px stroke with a White color.
Merge layer down. Layer name remains, "Pot 1"
Step 14
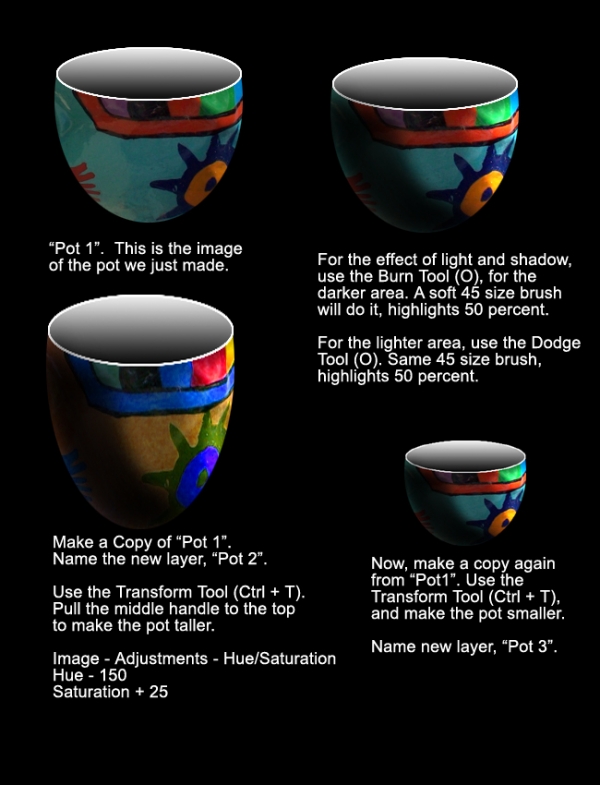
For the effects shown in picture, read carefully the steps given below. It is up to you to color your pots. Just use the Image - Adjustments - Hue/Saturation.
For the shaded areas use the Burn Tool (O).
For the highlights use the Dodge Tool (O).
For the shaded areas use the Burn Tool (O).
For the highlights use the Dodge Tool (O).
Step 15
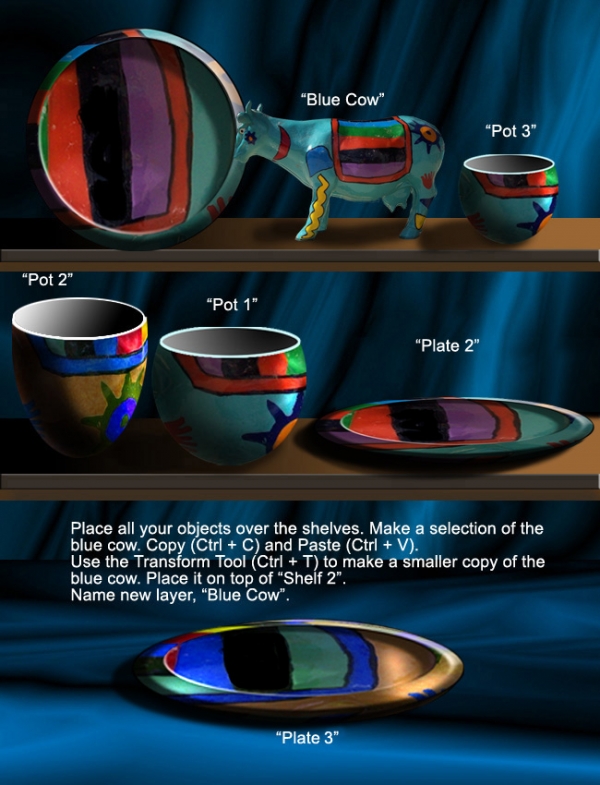
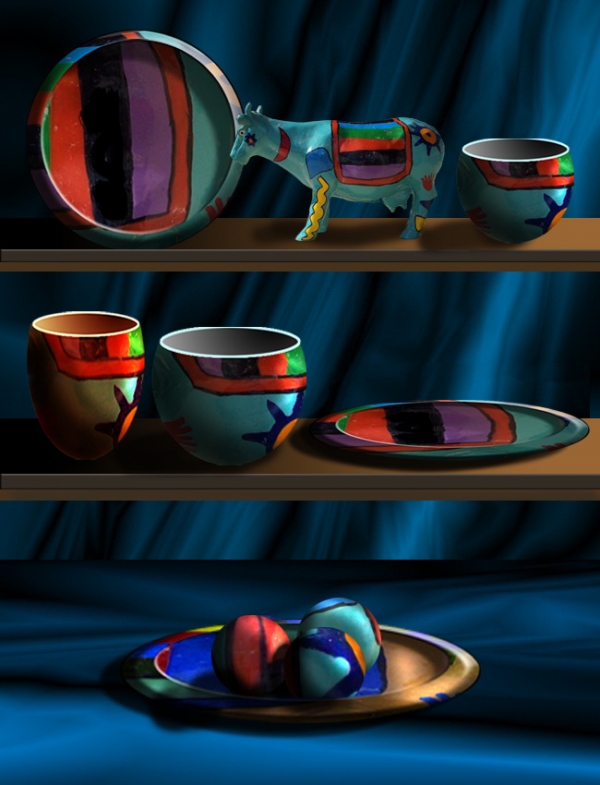
Placing the objects over the shelves.
Place all your objects over the shelves. Make a selection of the blue cow. Copy (Ctrl + C) and Paste (Ctrl + V).
Use the Transform Tool (Ctrl + T) to make a smaller copy of the blue cow. Place the copy on top of"Shelf 2".
Name new layer, "Blue Cow".
Place all your objects over the shelves. Make a selection of the blue cow. Copy (Ctrl + C) and Paste (Ctrl + V).
Use the Transform Tool (Ctrl + T) to make a smaller copy of the blue cow. Place the copy on top of"Shelf 2".
Name new layer, "Blue Cow".
Step 16
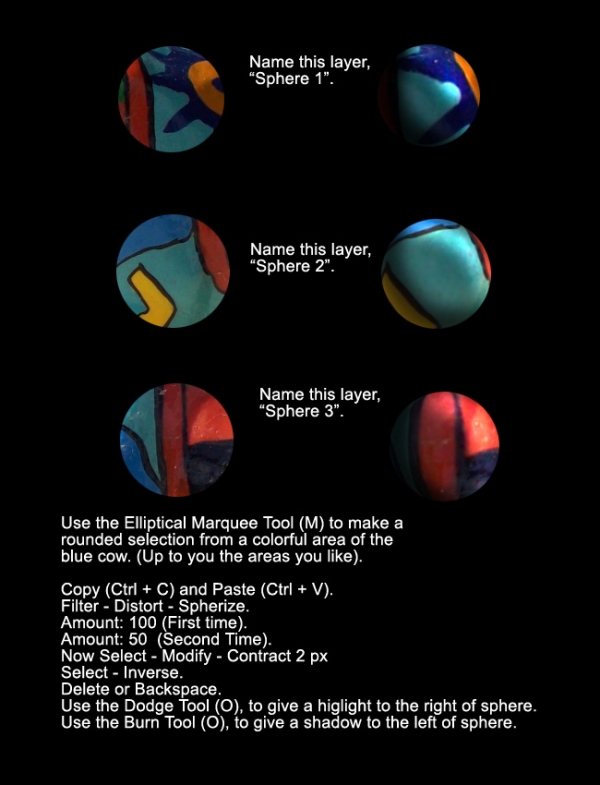
Making the spheres.
Use the Elliptical Marquee Tool (M) to make a rounded selection from a colorful area of the blue cow. (It is up to you to select the areas you want.
Copy (Ctrl + C) and Paste (Ctrl + V).
Filter - Distort - Spherize.
Amount: 100 (first time).
Amount: 50 (second time).
Now Select - Modify - Contract 2 px.
Select - Inverse.
Delete or Backspace.
Use the Dodge Tool (O) for highlight the right side of sphere, and the Burn Tool (O) for shadows on the left side.
Step 17
Read carefully the directions given below to accomplish your work. This is almost the ending, if you are happy with the result, think about merging the layers down, or if you plan to make some changes, leave the image as it is.

Step 18
We arrived to the end of this tutorial. I thank you for taking the time to read and practice it. It is rewarding to help others to learn. I encourage you to continue your practice using Photoshop. Please be welcome to check all of the other tutorials that pxleyes has for all of us.
Good luck and would like to see some of your practice entries.
Good luck and would like to see some of your practice entries.
No comments:
Post a Comment